Fix Espresso Channeling at Home, Shot by Shot
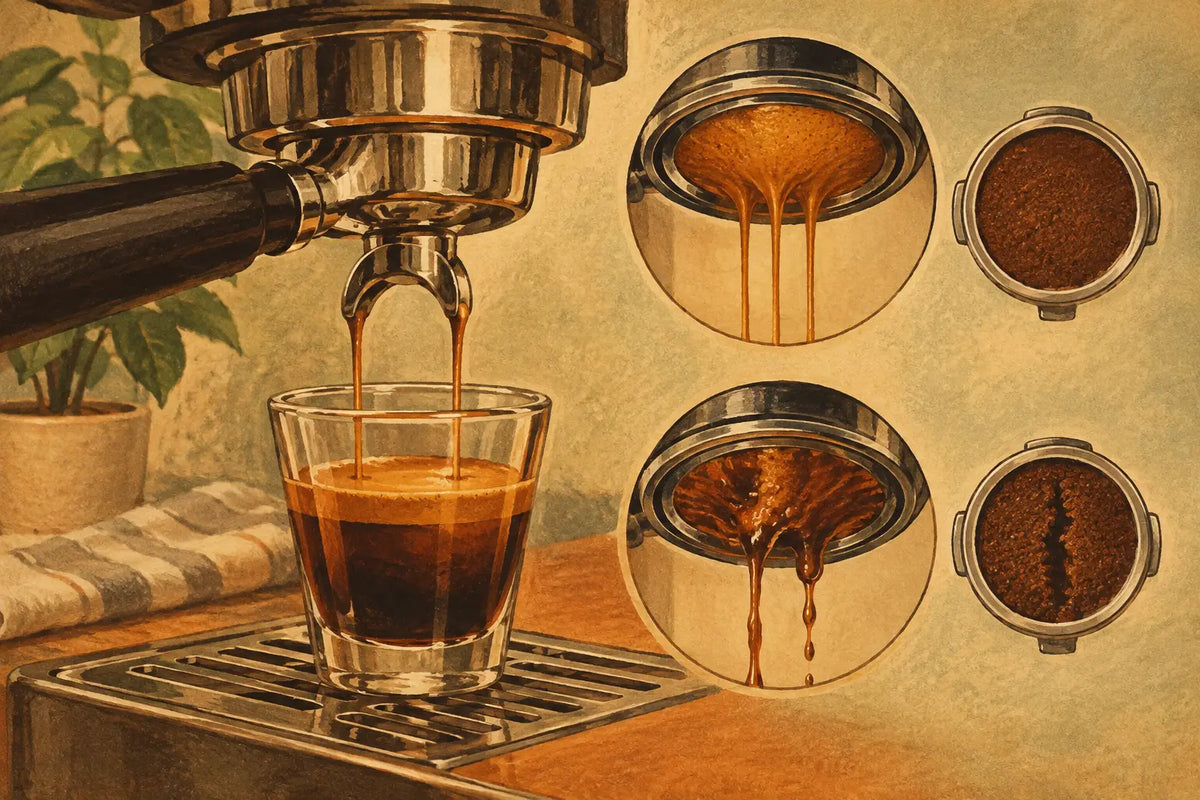
A bottomless portafilter makes channeling hard to ignore: one clean, honey-colored stream should form beneath the basket, but instead you see sudden sprays, pale streaks, or a fast stream from one side. The good news is that you can fix espresso channeling at home without chasing every new accessory or changing your machine. Start with a repeatable puck-prep routine, then adjust one variable at a time.
Channeling is not just a cosmetic problem. Water always follows the easiest path through coffee. Once it finds a crack, thin patch, or poorly distributed area, it rushes through that route and leaves other parts of the puck under-extracted. The cup can taste both sour and bitter at once, with a thin body despite a darker-looking shot.
What Espresso Channeling Actually Tells You
Espresso is a controlled resistance problem. Your grinder creates particles, your basket holds them in a compact bed, and the machine pushes water through that bed under pressure. For the water to extract evenly, the coffee needs reasonably even density from top to bottom and edge to edge.
A channel can begin before the portafilter ever reaches the group head. Clumps from the grinder, an uneven dose pile, a tilted tamp, or a void along the basket wall all create weak spots. It can also begin during brewing if the puck has too much headspace, the shower screen is dirty, or the machine’s water delivery is uneven.
Do not diagnose channeling from one shot alone. Watch for a pattern across several shots made with the same coffee, dose, and recipe. A bottomless portafilter is useful because it shows where the problem begins, but it is not mandatory. Repeated uneven flow, fast shots at a normal grind setting, and inconsistent flavor are enough evidence to investigate.
Fix Espresso Channeling at Home: Start With Puck Prep
The highest-return fix for most home baristas is better distribution. Coffee exits a grinder in a mound, often with small clumps and more coffee concentrated in one part of the basket. Tamping that mound flat does not necessarily make the density underneath flat.
Use a dosing funnel if it helps you work cleanly, then break up clumps with a fine-needle WDT tool. Stir gently through the full depth of the dose, paying attention to the outer edge of the basket where coffee can pack densely or leave gaps. The goal is not aggressive whisking. It is an even, fluffy bed with no obvious clumps.
After WDT, settle the grounds with a light tap or a leveler used carefully, then tamp once. Avoid repeated hard taps on the portafilter after tamping. They can disturb the puck and create fractures along the sides. A properly fitting funnel and WDT tool make this part of the workflow less messy, especially with deeper precision baskets that sit close to the rim.
Tamp level, not harder
A heavy tamp is rarely the cure for channeling. Once the puck is compressed enough, adding more force changes little. What matters is a level, stable tamp that leaves no obvious slope for water to favor.
Stand square to the counter and keep the tamper face parallel to the basket rim. If your wrist angle makes that difficult, a self-leveling tamper or a simple tamping station can help build consistency. The trade-off is that these tools improve repeatability, not poor distribution. A perfectly level tamp on a clumpy bed can still channel.
Check dose and headspace
An overfilled basket can press hard against the shower screen, disturbing the puck when you lock in the portafilter. An underfilled basket leaves excessive headspace, which can allow water to strike the puck with more force before it is evenly saturated.
Use the basket’s stated dose range as a starting point, not a law. After pulling a shot, inspect the puck and shower screen. A clearly imprinted shower-screen screw or deeply fractured puck often points to too much coffee or too little clearance. If the puck is soupy, do not assume the dose is wrong - many modern machines release pressure in a way that leaves a wet puck. Flavor and flow matter more than dry-puck appearance.
Dial In the Grind Before Changing Everything Else
If the shot runs too fast, grind finer. If it chokes or takes far too long, grind coarser. This sounds basic, but channeling often sends people in the wrong direction: they see spurting, grind much finer, and create a puck that is so resistant water finds one dramatic weak path.
Make small adjustments. For a typical double basket, choose a dose and keep it fixed. Then target a sensible starting ratio, such as 18 grams in and 36 grams out, while watching time and tasting the result. If your coffee reaches yield much too quickly, tighten the grind a little. If it takes too long and tastes dry or harsh, open it up.
Freshness matters here. Coffee changes noticeably after opening, and a grinder that was correct last week may need a finer setting today. Very fresh coffee can also produce more crema and uneven-looking flow. Give it enough resting time after roasting when possible, then evaluate flavor rather than judging only the visual show beneath a bottomless portafilter.
Keep the grinder clean and dose consistently
Retention and stale grounds make dialing in feel random. Purge a small amount after a major setting change and keep the chute reasonably clean. Weigh every dose until your results are stable. A variation of even a few tenths of a gram can matter in a small espresso basket, particularly with light roasts or high-precision baskets.
If your grinder produces persistent boulders, fines, or clumps, puck prep can reduce the symptoms but cannot completely erase the particle distribution. That does not automatically mean you need a new grinder. It means you should use a forgiving recipe and focus on repeatability before blaming your technique.
Look at the Basket, Portafilter, and Group Head
A dented basket, blocked holes, or a warped portafilter can create one-sided flow no matter how carefully you distribute. Hold the basket to a bright light and look for clogged or irregular holes. Soak and scrub it when needed, especially if you use darker, oilier coffee.
Also inspect the shower screen and group gasket. Coffee residue on the screen can disrupt water before it reaches the puck. A worn gasket can make locking in inconsistent, while a loose or damaged shower screen may deliver water unevenly. Backflush according to your machine manufacturer’s guidance and keep the group clean as part of normal maintenance.
Basket size and shape matter too. A 58 mm basket generally gives you more room to distribute than a narrower 54 mm basket, but either can produce excellent espresso. Make sure your tamper matches the basket closely. A tamper that is too small leaves an untamped ring around the edge, one of the most common places for water to sneak through.
Do Not Let Accessories Replace Diagnosis
Good accessories make a home workflow cleaner and more repeatable. A well-made WDT tool, properly sized tamper, dosing funnel, and stable tamping surface can remove small sources of inconsistency. For enthusiasts who want a setup that works as thoughtfully as it looks, NepoCoffee accessories can also be matched to the machine and daily workflow you already enjoy.
But buy tools for a specific problem. A distributor cannot compensate for an incorrect grind. A precision basket may reveal weaknesses that a stock basket hid. Flow-control profiling can be valuable, yet it adds another variable while you are still trying to understand basic puck prep.
Build your process in order: weigh the dose, distribute thoroughly, tamp level, lock in without delay, and pull to a measured yield. Once that feels automatic, experiment with basket upgrades, preinfusion, or flow control. The best upgrade is the one that makes your next shot easier to repeat.
A Simple Channeling Test Routine
When shots become erratic, return to a controlled test for three or four pulls. Use the same coffee, water, basket, dose, yield, and temperature setting. Clean the basket and shower screen first. Then change only the grind until the shot lands near your target time and tastes balanced.
If channeling remains visible at a reasonable grind, focus on distribution and tamp level. If it always appears in the same spot, inspect the basket holes, shower screen, and portafilter alignment. If it appears only occasionally, your routine is likely the variable - often an inconsistent dose, rushed WDT, or a bump to the portafilter before brewing.
A little unevenness in the first seconds of a shot is normal, and not every drip means failure. What you are looking for is improved flavor, steady flow, and a process you can repeat before the morning gets busy. Treat channeling as feedback from the puck, not a verdict on your equipment, and each adjustment will bring you closer to the sweeter, fuller espresso your coffee can deliver.